This is the multi-page printable view of this section. Click here to print.
Best practices
1 - Software Installations
Always perform a complete system upgrade when installing new software. While this may seem unconventional, partial upgrades are unsupported under Arch Linux. Installing software separately from the last system upgrade can lead to inconsistencies with dependent libraries on your system.
Graphical User Interface (GUI)
Installing Software
-
Click the Add/Remove Software button in the taskbar:

-
Select
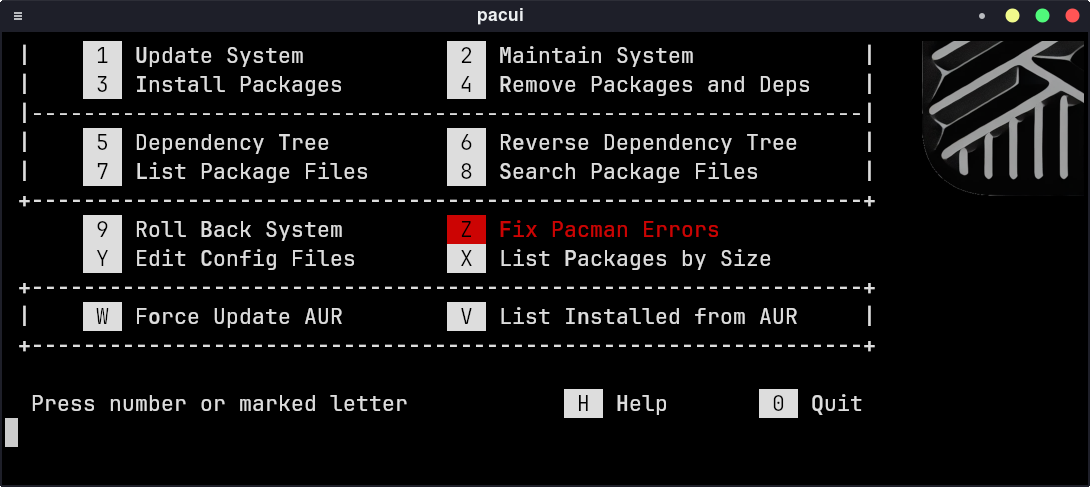
1 Update System. -
Then, choose
3 Install Packages. -
Use the incremental search feature to quickly locate and install the desired software.
Updating the System
-
Double-click the blue arrow-shaped
Kaluicon in the system tray:
-
Follow the on-screen instructions to proceed with the system updates.
Terminal
Installing Software
Utilize Ditana’s addpkg alias to install software. For example:
addpkg spotify
This command will install the specified software and perform an upgrade simultaneously. To uninstall software, use rmpkg, which ensures that no unused dependencies remain on your system.
If you are unsure of the exact package name, first upgrade your system using pikaur -Syu. Then use:
pikaur <package>
This command will offer installation candidates sorted by their vote count.
Updating the System
Execute the following command to update your system:
pikaur -Syu
2 - Automatic System Snapshots
Automatic system snapshots are configured independently of the chosen file system when the corresponding setting is enabled (see “Expert Settings” ⇒ “System Maintenance Tools” ⇒ “Configure Automatic System Snapshots”). These snapshots are created each time a complete system upgrade is performed. On ZFS and BTRFS filesystems, these snapshots are atomic, meaning they occur almost instantaneously and ensure a consistent state by capturing all files at the exact same point in time.
The initial snapshot is taken at the end of the installation process. Additionally, for XFS and EXT4 filesystems, this strategy offers the advantage that the first snapshot in a running system requires significantly less time (typically under 5 seconds), similar to subsequent snapshots.
Recovery Procedure
If your system fails to boot, you can recover by booting from the ISO, which provides access to a rescue system. Within this environment, you can use the commands below to restore a snapshot.
Note: As these are “system snapshots,” your home directory and other volumes remain unchanged. This allows you to restore a system snapshot without affecting your personal files.
Filesystem-Specific Instructions
ZFS
-
List Available Snapshots:
zfs list -t snapshotExample output:
❯ zfs list -t snapshot NAME USED AVAIL REFER MOUNTPOINT ditana-root/ROOT/default@autosnap_2024-11-21_23-14-41 453K - 3.96G - ditana-root/ROOT/default@autosnap_2024-11-21_23-25-28 394K - 3.96G - ditana-root/ROOT/default@autosnap_2024-11-21_23-26-06 1.05M - 3.96G - -
Restore a Snapshot:
sudo zfs rollback <SNAPSHOT_NAME>Example:
sudo zfs rollback ditana-root/ROOT/default@autosnap_2024-11-21_23-27-12
BTRFS, XFS, EXT4
Automatic snapshots are managed by the timeshift-autosnap package and do not require additional configuration via Timeshift. This package ensures that system snapshots are created automatically during each Arch Linux system upgrade.
-
List Available Snapshots:
sudo timeshift --listExample output:
> sudo timeshift --list Mounted '/dev/dm-0 (sda4)' at '/run/timeshift/195216/backup' Device : /dev/dm-0 (sda4) UUID : cca08543-da4e-44a0-839b-d20e6f258c9a Path : /run/timeshift/195216/backup Mode : RSYNC Status : OK 1 snapshots, 14.2 GB free Num Name Tags Description -------------------------------------------------- 0 > 2024-12-21_18-04-37 0 after installation of Ditana GNU/Linux -
Restore a Snapshot:
sudo timeshift --restore --snapshot <SNAPSHOT_ID>Example:
> sudo timeshift --restore --snapshot 2024-12-21_18-04-37
Mounted '/dev/dm-0 (sda4)' at '/run/timeshift/208067/backup'

**************************************************************************
* To restore with default options, press the ENTER key for all prompts! *
**************************************************************************

Press ENTER to continue...

Re-install GRUB2 bootloader? (recommended) (y/n): n
Important Note 1
Do not follow Timeshift’s recommendation to reinstall GRUB2, as Timeshift assumes an
update-grubtool is available. If you need to update GRUB after restoration, execute:grub-mkconfig -o /boot/grub/grub.cfgImportant Note 2
Unlike ZFS snapshots, after restoring with Timeshift, you must run:
sudo rm /var/lib/pacman/db.lckThis ensures a consistent state. The necessity arises not from Timeshift itself, but from the sophisticated strategy employed by zfs-autosnap.
3 - Desktop
Window Resizing
XFCE offers an unconventional yet highly convenient and reliable method for resizing windows. Instead of dragging the window border, hold down the Alt key and right-click near the edge you wish to adjust.
Cheat Sheet
The Ditana Cheat Sheet provides numerous useful tips and is automatically overlaid on the desktop wallpaper. To display it, press Ctrl + Alt + D. Follow the on-screen instructions to customize it to your specific needs.
Ditana Assistant
The leftmost icon in the taskbar launches the Ditana Assistant. For detailed instructions on how to utilize it, please refer to the Ditana Assistant documentation.
Scaling
To adjust the font size, avoid using XFCE’s DPI scaling. Instead, use the font size settings:

DPI scaling is automatically managed by Ditana and precisely matches the connected primary display. If you switch displays, the scaling will update in real-time.
Software Installations and Updates
Kalu will notify you when system updates are available (indicated by the blue arrow-shaped icon in the system tray). Applying these updates is essential not only for new features and security but also for maintaining stability regarding package dependencies in Arch-based systems. For more information, please refer to Software Installations.